Project Context
When working on a project, it is mandatory to ensure that all the artists work in the same context: they all have to create images that have the same resolution, use the same file formats, same naming conventions…
The harmonization of the artists configuration will be provided by the use of a referenced Project Settings file. But to be sure that the Project Settings configuration is well applied in every Blender file of the project and in each one of the scenes they contain, the artists must use a Blender that is already pre-configured with the project settings. This is called the [Project_Context].
Launching Blender in a context of project
To do so, a little setup has to be done: the artits will then launch their local Blender instance thanks to a customized shortcut including a command line that will execute a script to automatically activate the use of a Project Settings file to every new scene of every Blender file created by this Blender instance.
Note that if this Blender instance is launched the usual way, ie without the use of the shortcut, it will behave as usual and new scenes will not use the Project Settings.
These steps are for Windows. You can easily adapt them to a Mac or Linux environment.
1: Add a Project Settings file for your project
Start by creating a Project Settings file.
Rename it so that its name have reflect the fact that it belongs to your project.
Place it at the root of your project structure (or wherever you want in the project tree).
eg: z:/Perspectives/Perspectives_ProjectSettings.json
2: Add a Python file that will contain the instructions to set up the Project Settings file when Blender is launched
Download the file set_context_for_my_project.py from the StoryLiner support GitLab and save it in your project folder, in the directory you find suitable.
Rename the file to include the name of your project.
eg: Z:/Perspectives/set_context_for_Perspectives.py
Open this file in a text editor and enter the path of the Project Settings file created previously to the line where the variable project_settings_file_path is set:
eg:
# set your project file path here:
# eg: project_settings_file_path = "z:/MyProject/MyProjectSettings.json"
project_settings_file_path = "Z:/Perspectives/Perspectives_ProjectSettings.json"
Save the file.
3: Create a customized shortcut to launch Blender
Note: If the artists working on the project do not all have the same Blender installation path, this step will have to be done for each one of them, on their own computer
Copy the following code line to a text editor and adapt it to your project by replacing <python file path> by the path of the Python file.
--start-console --python "<python file path>"Don’t forget to add a space before the 2 - characters !
Go to the folder where Blender is installed.
Create a shortcut from the “blender.exe” file and place it on the desktop.
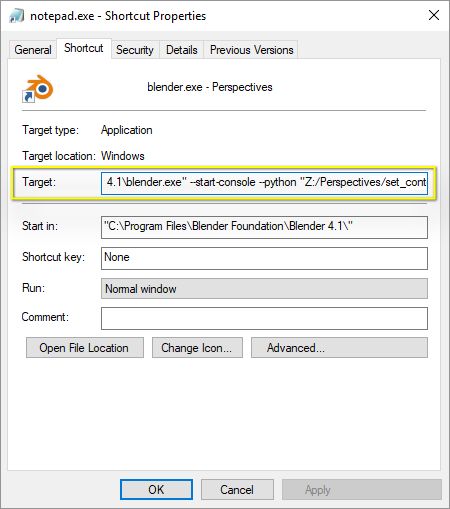
Right-click on it and click on the last item, named “Properties”.
Then, in the text field “Target”, add the modified code line at the end of the path.
click on the OK button to save the changes.
eg: The new target text should look similar to this:
"C:\Program Files\Blender Foundation\Blender 4.1\blender.exe" --start-console --python "Z:/Perspectives/set_context_for_Perspectives.py"

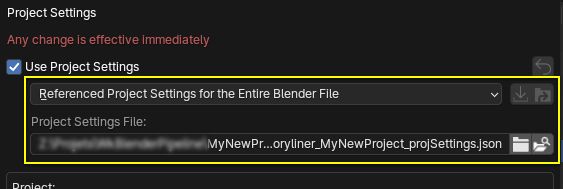
Now, every time Blender is launched with with shortcut, the session will be in the context of your project. Every new Blender file, and every new scene created in those files, will have your Project Settings configuration set by default. They will keep them, unless you manually change the Project Settings mode or turn off the use of the Project Settings.
So, in the Project Settings panel, the Project Settings mode will be set to “Referenced Project Settings for the Entire Blender File”.

When the Project Settings are used, the name of your project will be displayed in the title bar of the StoryLiner main panel. When Blender is launched in the context of a project, the name of your project will also be displayed in the main toolbar of Blender.
